
[Power BI] Connecting SharePoint Excel File to Power BI (Web version)


Requirement
: Auto-update of Power BI report when an excel file in SharePoint is updated.

Assumptions: Power BI is already installed. User has general knowledge in SharePoint and Power BI.

Level: Beginner

Connecting SharePoint Excel File

2. On the Power BI homepage, click Get data located on the lower left corner of the page. 


3. You will be given options where to get the data you will use in your report. Select Files.


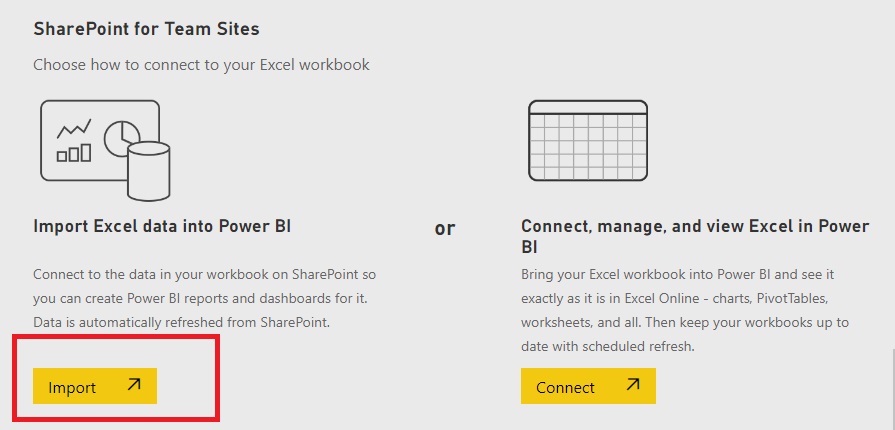
4. From the displayed options, select SharePoint - Team Sites.


5. You will be asked to enter the URL to connect to. Enter the root URL of the SharePoint site where the excel file you will use is saved.


6. The list of SharePoint folders will be displayed. 


7. Select the excel file from the SharePoint list. Click Connect.


8. Click Import.


9. On the homepage, click Create and select Pick a published dataset.


10. Select the file that you want to use from the list and click Create.


11. You are now ready to create a report from the excel data linked to SharePoint. Once you update the data in excel in SharePoint, changes will be reflected automatically in your Power BI report.


Comments

Popular posts from this blog

[Excel] How to Protect Multiple Excel Tabs with Different Passwords

Requirement:  I have an excel file with multiple tabs which is being updated monthly by many users. I want to create a password for each tab so that each user can only view and edit their own tab. Limitation : Protect Sheet Function in Excel is notoriously weak.  Solution : Use VBA code to set up password on each tab. Protecting Multiple Tabs with Different Passwords Let's say I have three teams which need to report their daily sales in one excel spreadsheet. The three teams are named Team Apple, Team Watermelon and Team Grapes. First, let's create a new tab for each one of them. 1. Add three new tabs and rename each according to the team name. 2. Create a column for 'Name', 'Item', 'Sales' and 'Date' for each team.  3. Click Visual Basic from the 'Developer' tab. 4. From Sheet 2 to Sheet 4, copy and paste the VBA code below: VBA Code: Private Sub Worksheet_Activate()     Dim strPassword As String     'On Error Resume Next          M

[Google Sheets] How to Create a QR Code

What is QR Code? Qr Code or "Quick Response" code is a type of barcode with embedded alphanumeric information that can be read and understood by mobile devices. What is the purpose of QR Code? QR Code   provides a convenient way to store and distribute information to enable the users redirect towards a website, access social media pages, download an app, make payments and do many other useful things with little effort. How to Create QR Code in Google Sheets? The sample below shows how to create a QR Code that enables easy access to a website. 1. Open the Google sheets and enter the link of the website. 2. Copy and paste this formula in the cell beside the website link: =IMAGE ("https://chart.googleapis.com/chart?chs=150x150&cht=qr&chl=" & A1) Note : A1 refers to the cell where the website link is located. Change according to the cell reference. 3. Click Enter . 4. The QR code will be generated. 4. Scan the QR Code using your phone by pointing the camera

[Excel] How to Remove Password in Excel

  If you know the password of your Excel file and you want to delete it, there are several ways on how to do it. Remove password from "Info" panel 1. Open the encrypted Excel file. 2. Enter the password and click OK . 3. On the upper left corner, click the File tab. 4. In the left-hand panel, click Info and Protect Workbook to open the drop-down menu. 5. Select Encrypt with Password and delete the password that appears in the text field. 6. Click OK . 7. Go to File menu and click Save . Remove password from the "Review" tab 1. Open the encrypted Excel file. 2. Enter the password and click  OK . 3. On the main ribbon menu, click the Review tab. 4. Click Unprotect Sheet and enter the password. 5. Select Protect Sheet and click OK without entering a new password. 6. Go to the File menu and click Save . Remove password using the "Save as" option 1. Open the encrypted Excel file. 2. Enter the password and click  OK . 3. Go to the File tab and select S