
[Microsoft Flow] Send Email Notification to Multiple Users When a New Response is Submitted


Requirement
: Send email notification to multiple users when a new response in Microsoft Forms is submitted.

Limitation: When a Microsoft Form response is submitted, only the owner and the responder will be notified.

Solution: Use Microsoft Flow to send notifications to multiple users.

1. Log into https://flow.microsoft.com.

2. Click My flows in the left navigation bar.

3. Click New flow and select Automated cloud flow.

4. Before you create your flow, click on 'Untitled' and enter a name for your flow.


5. From the list of apps and tools, select Microsoft Forms.


6. Select the trigger for the flow which is 'When a new response is submitted'.


7. Click on the Form ID box and pick a form that you want to use from the list.


8. Click New Step.


9. Enter 'apply to each' in the search box and select Apply to each control in the 'Actions' tab.


10. Select Response Id from the 'Add dynamic content' menu.
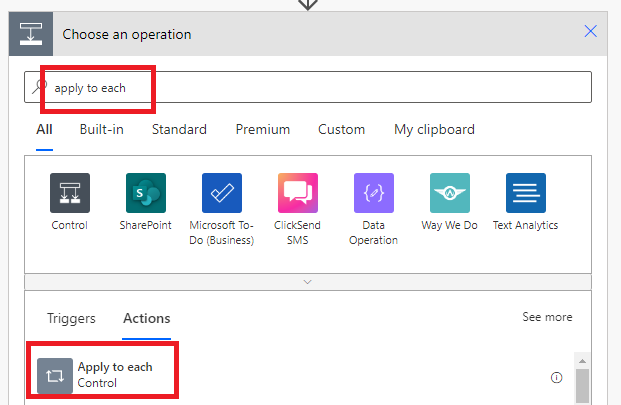
11. Click Add an action.


11. Enter 'get response' in the search box and select Get response details for Microsoft Forms in the 'Actions' tab.


12. Pick the form from the drop-down list and select Response Id in 'Add dynamic content' menu.
13. Click Add an action.


13. Enter 'send email' in the search box and select Send an email (V2) for Office 365 Outlook in the 'Actions' tab. You can also choose a different email service from the list under all apps.


14. Enter the email address of the users where the notification will be sent. Separate each email address by a semicolon. 
15. Enter the subject and message body for your email notification.


16. Click Save.

Comments

Popular posts from this blog

[Excel] How to Protect Multiple Excel Tabs with Different Passwords

Requirement:  I have an excel file with multiple tabs which is being updated monthly by many users. I want to create a password for each tab so that each user can only view and edit their own tab. Limitation : Protect Sheet Function in Excel is notoriously weak.  Solution : Use VBA code to set up password on each tab. Protecting Multiple Tabs with Different Passwords Let's say I have three teams which need to report their daily sales in one excel spreadsheet. The three teams are named Team Apple, Team Watermelon and Team Grapes. First, let's create a new tab for each one of them. 1. Add three new tabs and rename each according to the team name. 2. Create a column for 'Name', 'Item', 'Sales' and 'Date' for each team.  3. Click Visual Basic from the 'Developer' tab. 4. From Sheet 2 to Sheet 4, copy and paste the VBA code below: VBA Code: Private Sub Worksheet_Activate()     Dim strPassword As String     'On Error Resume Next          M

[Google Sheets] How to Create a QR Code

What is QR Code? Qr Code or "Quick Response" code is a type of barcode with embedded alphanumeric information that can be read and understood by mobile devices. What is the purpose of QR Code? QR Code   provides a convenient way to store and distribute information to enable the users redirect towards a website, access social media pages, download an app, make payments and do many other useful things with little effort. How to Create QR Code in Google Sheets? The sample below shows how to create a QR Code that enables easy access to a website. 1. Open the Google sheets and enter the link of the website. 2. Copy and paste this formula in the cell beside the website link: =IMAGE ("https://chart.googleapis.com/chart?chs=150x150&cht=qr&chl=" & A1) Note : A1 refers to the cell where the website link is located. Change according to the cell reference. 3. Click Enter . 4. The QR code will be generated. 4. Scan the QR Code using your phone by pointing the camera

[Excel] How to Remove Password in Excel

  If you know the password of your Excel file and you want to delete it, there are several ways on how to do it. Remove password from "Info" panel 1. Open the encrypted Excel file. 2. Enter the password and click OK . 3. On the upper left corner, click the File tab. 4. In the left-hand panel, click Info and Protect Workbook to open the drop-down menu. 5. Select Encrypt with Password and delete the password that appears in the text field. 6. Click OK . 7. Go to File menu and click Save . Remove password from the "Review" tab 1. Open the encrypted Excel file. 2. Enter the password and click  OK . 3. On the main ribbon menu, click the Review tab. 4. Click Unprotect Sheet and enter the password. 5. Select Protect Sheet and click OK without entering a new password. 6. Go to the File menu and click Save . Remove password using the "Save as" option 1. Open the encrypted Excel file. 2. Enter the password and click  OK . 3. Go to the File tab and select S